Synopsis
More or less this article will talk about making custom GNUradio embedded blocks and utilizing other blocks internally.
Context
For my job I had to make a custom DTMF encoder using GNUradio (rather overkill but needed to be done). In this case some other people have already made encoders but they did not have a proper input + output configuration and expected a constantvariable input. So this obviously needed to be adjusted.
DTMF Explanation
DTMF is effectively a dual tone method of encoding symbols into frequencies albiet in the audible frequency range. It consists of high and low frequency groupings and some arbitrary amplitude difference between the two (likely in the 3 to 2dB range). By default in the more extendedDTMF encoding format a 4x4 matrix can represent all of the symbols and the needed high and low frequencies.
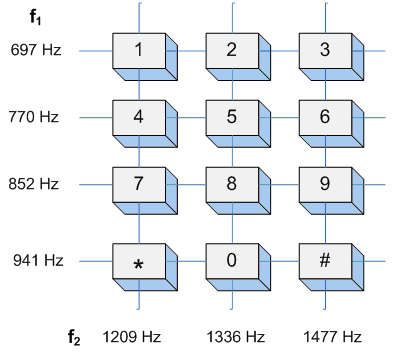
Standard DTMF Frequency to Symbol Table

For example, using that above table if I wanted to represent the symbol ‘1’ a mixing of 697 and 1209 Hz would be needed.
GNURadio Basic DTMF Breakdown
I highly recommend reading the gnuradio wiki on a lot of the modules but regardless I’ll break down the modules that are being used.
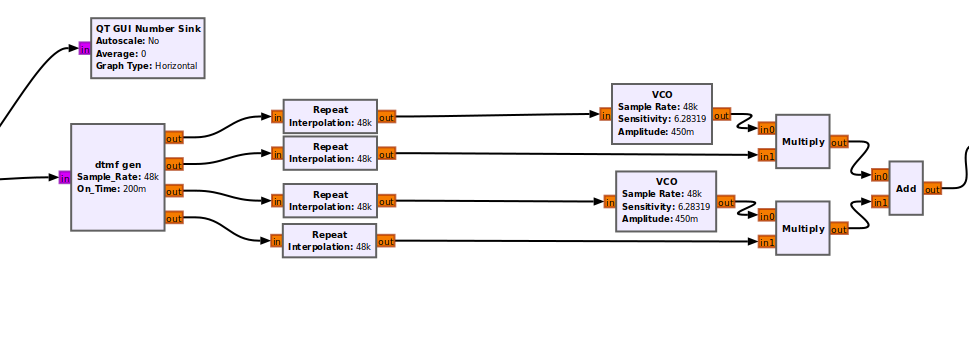
General DTMF Encoder Diagram
 This flow diagram is relatively simple. The dtmf gen block converts the input byte source (ascii dtmf symbols effectively) into 4 outputs (2 for the high and low frequency values, and 2 representing the amplitudes for the high and low groups). The repeat blocks are used to achieve an effective “baudrate”. However, in this example I assume a symbol a second for the baudrate with a sample rate of 48kHz. The VCO then converters the frequency value output from the dtmf gen to a valid sin source with that frequency (for both the high and low groups). Next, the amplitude outputs of both the high and low group are multiplied against the vco output to achieve a 3dB difference between the two signals. Lastly the two signals are mixed/added together to achieve the dual tone output.
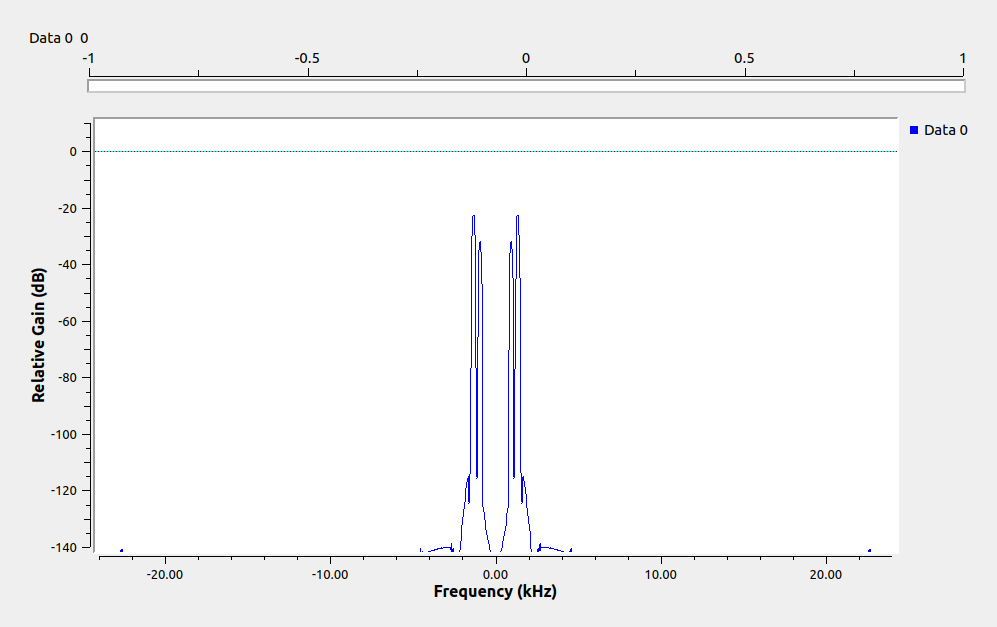
Example DTMF output with no filtering
 As you can see the dtmf output looks relatively correct with two peaks that are approximately 3dB different in amplitude from each other (obviously there is the negative/image components of this output but that can be filtered out later).
Obviously, this isn’t flow diagram isn’t ideal and it would be better to make all of these parts into one single block for easier integration. That is where using embedded python blocks and then OOT (Out of Tree) modules are used.
GNURadio Embedded Python Blocks
This part is relatively straight forwarded especially if you use the wiki as a guide. More or less you just make classes that follow one of the templates and provide input and outputs. Be cautious of the types for your inputs and outputs and make sure you are operating on them correctly since most of the time they are multi dimensional arrays.
DTMF Gen - Example Embedded Python Block
import numpy as np
from gnuradio import gr

# Inspired / Partially Forked from on1arf/gr-dtmfgen. Original design had fixed sequence input via variables. This one will have a char input
class dtmf_gen(gr.sync_block):
    # Static Variables for dtmf char conversion
    dtmf_freq = [697.0,770.0,852.0,941.0,1209.0,1336.0,1477.0,1633.0]
    byte2freq={
        49:(0,4), 50:(0,5), 51:(0,6), 65:(0,7),
        52:(1,4), 53:(1,5), 54:(1,6), 66:(1,7),
        55:(2,4), 56:(2,5), 57:(2,6), 67:(2,7),
        42:(3,4), 48:(3,5), 35:(3,6), 68:(3,7)
        }

    amp = (10**(-.5),1.0) # lower tone about 3dB lower than the higher tone

    def __init__(self, sample_rate=0, on_time=0):
        gr.sync_block.__init__(self,name='dtmf gen', in_sig = [np.ubyte], out_sig=[np.float32,np.float32,np.float32,np.float32])
        try:
            self.sample_rate = int(sample_rate)
            self.on_time = np.float32(on_time)
        except ValueError:
            raise ValueError("Error converting sample_rate, on_time to appropriate values")
        if (sample_rate < 0): raise ValueError("Error: sample_rate cannot be less than 0")
        if (on_time < 0): raise ValueError("Error: on_time cannot be less than 0")

    def get_samples(self, input_byte):
        try:
            f1,f2=dtmf_gen.byte2freq[input_byte]
            f1 = dtmf_gen.dtmf_freq[f1]
            f2 = dtmf_gen.dtmf_freq[f2]
        except KeyError:
            return (0.0,0.0,0.0,0.0)
        return (f1,dtmf_gen.amp[0],f2,dtmf_gen.amp[1])

    # work function
    def work(self, input_items, output_items):
        f1,amp1,f2,amp2=self.get_samples(input_items[0][0])
        output_items[0][:] = f1
        output_items[1][:] = amp1
        output_items[2][:] = f2
        output_items[3][:] = amp2

        #print("amp1: %f"%dtmf_gen.amp[0])
        #print("amp2: %f"%dtmf_gen.amp[1])
        return 1

if __name__ == '__main__':
    print("test")
Just for reference, the above is the rough dtmf-gen embedded module. I don’t necessary recommend the practices that were used when making this module but it still serves as semi usable reference
Some GNU radio debugging notes.
When using OOT modules (especially while developing them) if you have any import errors for your module while in the companion app, try to impor the module separately in a normal python interactive window. This will give a lot more information on what is causing the import to fail.